缓存一致性协议和内存屏障
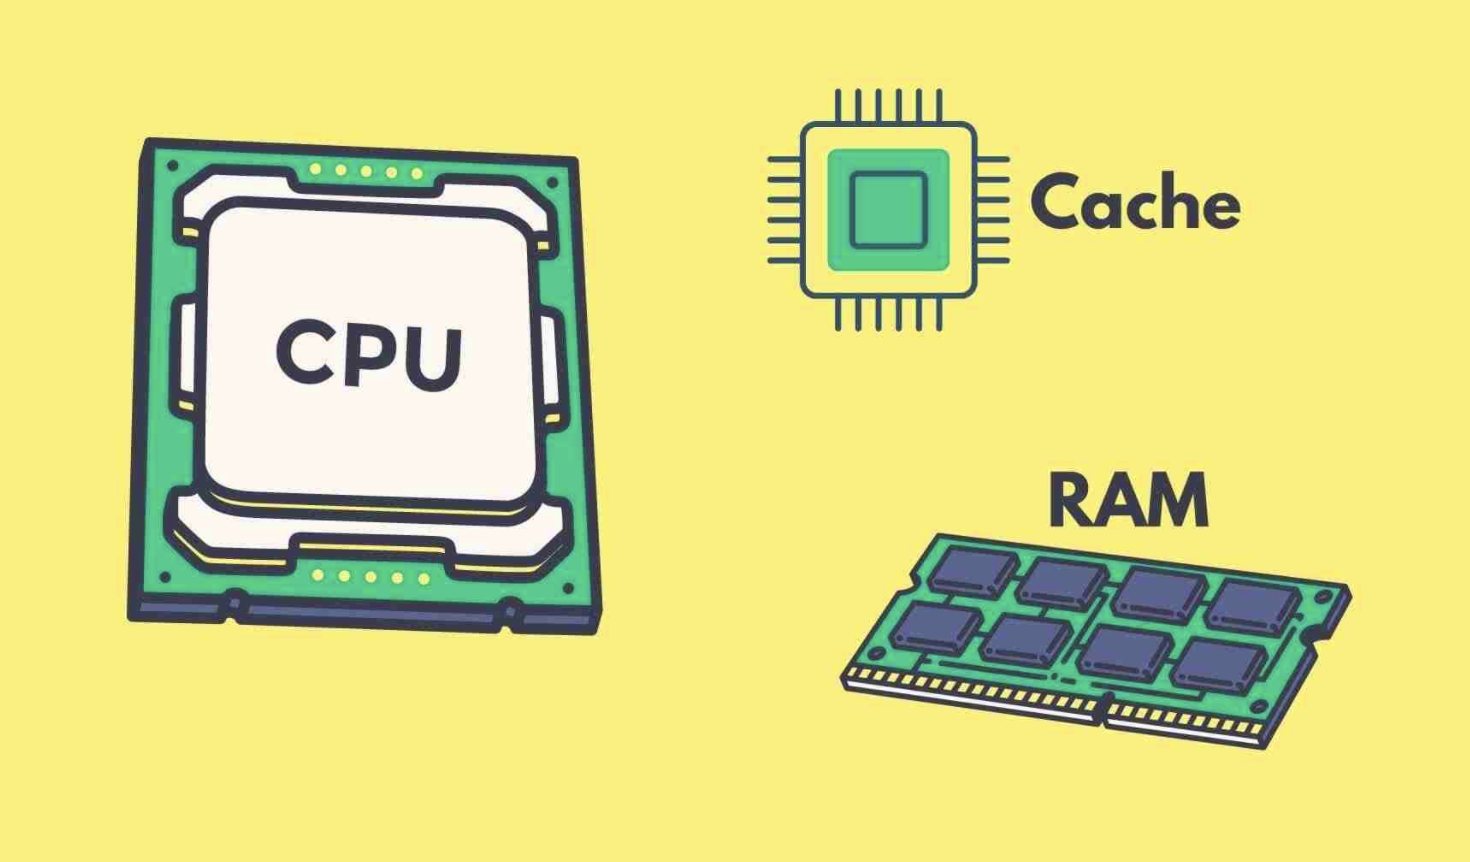
现代 CPU 一般都是有多级缓存的,越靠近 CPU 的缓存越快也越小。CPU 缓存层数并不固定,通常是三层,因此这里以三层缓存的典型 hierarchy 来进行叙述。
CPU 的三层缓存我们称之为 L1,L2 和 L3 cache,也被称为一/二/三级缓存。其中:
- L1 和 L2 cache 为每个核特有,L1 缓存是最小最快的缓存。
- L3 为单个插槽上的所有 CPU 核心共享。
- 主存保存这程序运行的所有数据,相比较 L1/L2/L3 而言,更大更慢,由所有插槽上的所有 CPU 核心共享。
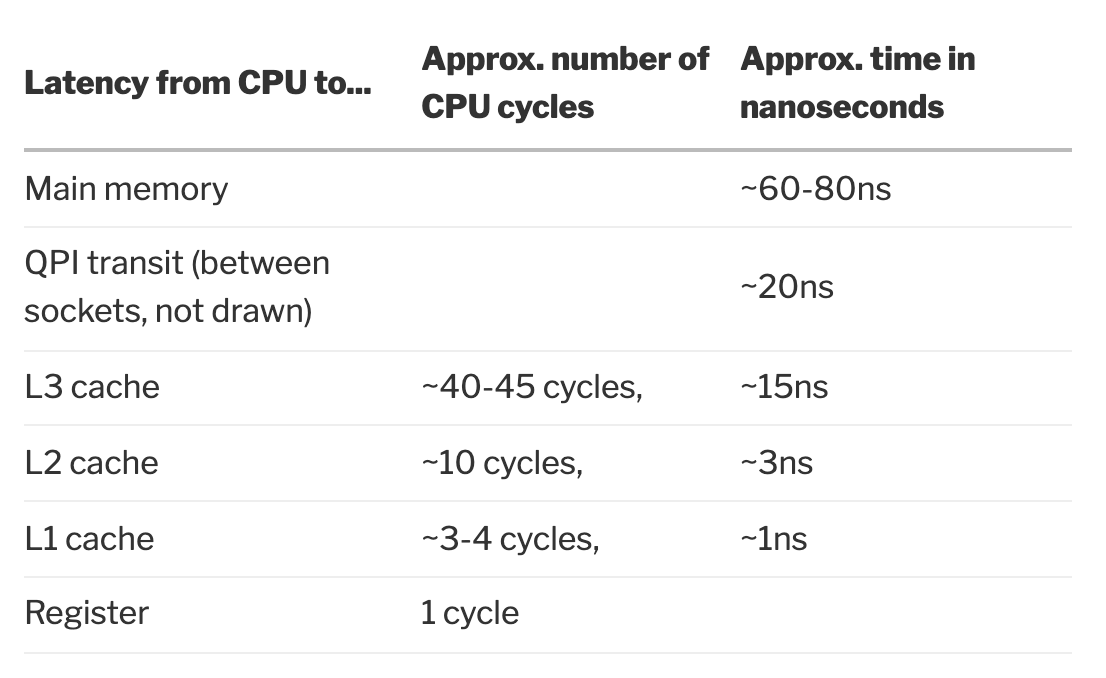
下图从 CPU 到各级别 cache 的速度,这里是一个广义的 cache ,因此包含了从主存、QPI 和寄存器,本地磁盘也可以看做是其他外部存储的 cache。可以看到 L1/L2/L3 各级缓存的速度差异还是比较大的,尤其是到了 L3 这一层级。
具体地针对 CPU 中的各级缓存,L1 还分为指令缓存(也被称之为 iCache,是只读的)和数据缓存(也被称之为 dCache),L2 和 L3 则不区分指令缓存和数据缓存。
在 L1/L2/L3 的三层缓存结构之外,还有很多 CPU 缓存层级结构,比如在苹果的 M1 芯片的大小核心里:
四个高性能核心均有 192 KB指令缓存和 128 KB数据缓存,并共享 12 MB二级缓存;四个低功耗核心均有 128 KB指令缓存和 64 KB数据缓存,并共享 4 MB二级缓存。
事实上,M1 没有真正意义上的三级缓存。
cache line & cache associativity
CPU 在加载 L1/L2/L3 cache 的时候,是按照 cache line (也叫 cache block,译作缓存行/缓存块)为基本单位来进行加载的。CPU 中的 cache 由多个 cache line 组成。通常 L1 cache 中的 cache line 为 64 字节。
CPU 在加载特定地址的数据时是从 cache 中按照 cache line 去寻址的。那么这就要求主存中的数据和 cache line 是有某种关联关系的。我们称之为 associativity 。具体地有多种方式,先来介绍最简单的 direct mapped cache 和 fully associative cache。
我们下面以 wikipedia 示例中的 14 位内存地址空间( cahce line 为 4 bytes)举例:
direct mapped cache:即直接映射的 Cache,内存中的地址通过哈希或者某种方式映射到 cache line 中的固定位置。下图为 2^2=4 bytes 的 cache line,2^6=64 个缓存行,4*64=256 bytes 的缓存大小,14 位地址空间下的情况:

fully associative cache:即全相联的 cache,任何地址都可以映射到 cache line 中的任何位置。下图为 2^2=4 bytes 的 cache line,2^6=64 个缓存行,4*64=256 bytes 的缓存大小,14 位地址空间下的情况:

那么:
- 对于第一种方式,局部性问题最终会导致内存利用率低下,因为没有办法保证缓存的数据大部分是热点数据,可能非热点数据占据了大量的缓存行。
- 对于第二种方式,我们可以采用 LRU 的方式来保证一定的缓存命中率,但是此时寻址的时间复杂度就变成了
O(n),n 是 cache line 的个数,这也是让人难以接受的。
在现代操作系统中,使用了 N-way set-associative cache(组相联的 cache),本质上其实就是 direct mapped cache 和 fully associative cache 的结合,并进行了一些 trade off。下图为 2^2=4 bytes 的 cache line,2-way 情况,2^5=32 组,2*(2^5)=64 个缓存行,4*64=256 bytes 的缓存大小,14 位地址空间下的情况:

N-way set-associative cache 将所有的 cache line 分为 M 个组,每个组 N 个缓存行(也被称之为 N 路),这 M 组进行直接映射,M 个组内部的缓存行进行全相联的 cache line 。比如上图就是 32 个组,每组 2 个缓存行,那么它就是 2-way set-associative cache。
CPU 中的 cache line 是以 cache entry 的形式进行存储的,诸多的 cache entry 组合起来可以看作是一个大的数组。下图就是 cache entry 的结构。

其中:
- tag 保存了内存地址的一部分,通过 cache entry 的位置和 tag 的位置我们可以唯一确定一块内存地址;
- data block 即 cache line,即从主存中拷贝过来的数据;
- flag 是一个标志位,记录比如缓存是否失效这些数据;
值得注意的是,缓存的大小只包含其中的 data block 的大小,而不包含 tag 和 flag 部分,因此我们在计算当前缓存有多少缓存行时,直接除以 data block 部分的大小即可。
而内存地址也分成三个部分:
")
其中:
- tag 与 cache entry 中的 tag 对应;
- index 表示对应的 cache line 在 cache entry 大数组中的索引;
- offset 表示对应的内存在 cache line 中的偏移量;
在一个 14 位的内存地址中,如果 cache line 是 4 个字节,那么 offset 就需要 4 位(2^2 = 4),如果有 32 组的话,index 就需要 5 位(2^5 = 32)。index 和 offset 就能确定这个内存地址在缓存中的位置。那么 index 和 offset 和当前地址一样的也可能会映射到缓存里相同的位置(可能是,不是 100%),那么这个时候就需要剩余的 tag 来确定具体的内存地址了。比如:
1 | // index 为 5 位,offset 为 2 位,地址空间为 14 位。 |
上面这三个地址就可能会映射到缓存里相同的位置,因为它们的 index 部分和 offset 部分是完全相同的。
我们再回头看上面的 2-way set-associative cache 这张图,就是一个 32 组的 2-way set-associative cache ,比如 block0 和 block256 就是 index 完全相同的(高 7 位完全相同)。里面的内存地址就会映射到 cache line0 和 cache line1 其中任意一个 cache line 中。如果 offset 也相同,它们就可能会产生碰撞。这会带来两个后果:
- 碰撞会带来缓存利用率的下降;
- CPU 最多要寻址两次才能找到指定的内存地址(实际上就是一个遍历过程);
如果 N-way set-associative cache 中的 N 增大会降低碰撞的概率,带来缓存利用率的提升,但是 CPU 的最大寻址次数也会随之而上升。那么这里就需要进行 trace off 了。其实这里也就是体现了上面提到的:
N-way set-associative cache本质上其实就是direct mapped cache和fully associative cache的 trade off ,通过分组组间实行direct mapped cache的思路,组内实行fully associative cache的思路。
上面是 L1 cache 的算法,其实 L2/L3 cache 也是这样的算法。
对于 N-way set-associative cache,当一个组内的全部缓存行都被占满之后,如果再次发生缓存失效,就需要选择一个缓存行来进行替换,比较常见的策略有两种:随机替换和 LRU 替换,有一些测试的结果表明随机替换的效果和 LRU 的效果近似,关于这两种策略这里就不再进行展开了。
特别地,如果 CPU 没有命中缓存,那么最小会以一个 cache line 的单元从内存更新数据,自然 CPU 并不一定会只更新 64 字节,因为相比较于访问 cache,访问内存太慢了,所以一般会有 prefetching 。CPU 会进行一些预测来更好的进行 prefetch。一个典型的例子:如果一个循环里访问一个连续数组,而且步长是一个固定的值,那么 CPU 就可以很方面地进行 prefetch ,更详细的内容可以参照 wikipedia 。
CPU 从内存往 cache 中读取数据的过程比较好理解,那么 CPU 在往 cache 和 CPU 更新数据时,就有多种策略了。
cache writing policies
write-through:同时更新 cache 和内存里的数据。write-back(also calledwrite-behind):只更新 cache 里的数据,在 cache entry 的 flag 中设置一个 dirty 标志位,内存中的数据更新会推迟到 cache line 被替换时。
那么如果要写的数据不在缓存里呢?类似地,也有两种数据:
no-write allocate(also calledwrite-no-allocateorwrite around):不加载内存中的数据到缓存,直接将数据写入到内存,数据只有在 read miss 时才会加载到 cache 中。write allocate(also calledfetch on write):写之前先将数据加载到缓存中,然后再进行 write through/write back。
通常情况下:write-through 与 no-write allocate 配对进行使用,write-back 与 write allocate 一起使用,如下:


现在主流的 CPU 基本上都是使用的 write-back 的方式,因为相比较于缓存,写主存实在是太慢了。
另外,现代 CPU 都是多核心结构,我们有必要在多个核心之间维护一个 cache line 状态来保证一致性,详细来说:
Entities other than the cache may change the data in the backing store, in which case the copy in the cache may become out-of-date or stale. Alternatively, when the client updates the data in the cache, copies of those data in other caches will become stale. Communication protocols between the cache managers which keep the data consistent are known as coherency protocols.
那么,coherency protocols 一般有两种实现机制:
- snooping(窥探的方式):更像是一种数据通知的总线型技术,CPU cache 可以以此识别其他 cache 上的数据状态,基于广播将缓存状态同步给其他的 CPU ,是一种分布式的同步方式,更像是现在流行的微服务 + 消息架构。
- directory-based:在主存储器中有一个目录,包含各种本地缓存内容的全局状态,是一种中心化的同步方式。
关于这两种方式的优劣,来自 wikipedia :
- The advantage of using bus snooping is that it is faster than directory based coherency mechanism. The data being shared is placed in a common directory that maintains the coherence between caches in a directory-based system. Bus snooping is normally faster if there is enough bandwidth, because all transactions are a request/response seen by all processors.
- The disadvantage of bus snooping is limited scalability. Frequent snooping on a cache causes a race with an access from a processor, thus it can increase cache access time and power consumption. Each of the requests has to be broadcast to all nodes in a system. It means that the size of the (physical or logical) bus and the bandwidth it provides must grow, as the system becomes larger. Since the bus snooping does not scale well, larger cache coherent NUMA (ccNUMA) systems tend to use directory-based coherence protocols.
事实上,现在 CPU 大部分是基于 snooping 来实现的。
coherency protocols & MESI
MESI 就是一个典型的 coherency protocol,也基于 snooping 实现。MESI 协议中的 M.E.S.I 分别表示缓存行的四个状态:
M: modified ,表示缓存行中的数据与主存不同,刚被 CPU 修改过,是脏的。如果别的 CPU 内核还要读取主存中的数据,那么该缓存行必须要写回到主存里,写回后状态变为共享(S)。
E:exclusive ,缓存行中的数据和主存中一样,即是干净的,但是数据只存储在当前 cache line 中。
S:shared ,缓存行是干净的且缓存行至少被一个其他 CPU 共享,因此该 CPU 不能被直接修改,需要和其他 CPU 进行协商。
I:invalid ,表示缓存行是无效的,即为空行,cache line 填充的时候会优先填充这些 invalid 行。
对于主存中相同数据的缓存行,不同 CPU 中 MESI 状态的相容关系分别是:
| M | E | S | I | |
|---|---|---|---|---|
| M | ❌ | ❌ | ❌ | ✅ |
| E | ❌ | ❌ | ❌ | ✅ |
| S | ❌ | ❌ | ✅ | ✅ |
| I | ✅ | ✅ | ✅ | ✅ |
可以看到,当一个 CPU 中当前数据的缓存行被标记为 M 或者 E 时,其他 CPU 中的对应缓存行就被会标记成 I。
实际的 MESI 状态机的变化是非常复杂的。下图是 wikipedia 中对 MESI 给出的状态变迁图。我们这里不会对 MESI 中的状态机做过多的深入。

Is Parallel Programming Hard, And, If So, What Can You Do About It? 中的 appendix part C 提到:
CPU 要实现上面那么复杂的状态变迁,如果 CPUs 是在一个单独的共享总线上,那么下面这些消息就已经足够了:
- read: The “read” message contains the physical address of the cache line to be read.
- read sesponse: The “read response” message contains the data re-quested by an earlier “read” message. This “read response” message might be supplied either by memory or by one of the other caches. For example, if one of the caches has the desired data in “modified” state, that cache must supply the “read response” message.
- invalidate: The “invalidate” message contains the physical address of the cache line to be invalidated. All other caches must remove the corresponding data from their caches and respond.
- invalidate acknowledge: A CPU receiving an “invalidate” message must respond with an “invalidate acknowledge” message after removing the specified data from its cache.
- read invalidate: The “read invalidate” message contains the physical address of the cache line to be read, while at the same time directing other caches to remove the data. Hence, it is a combination of a “read” and an “invalidate”, as indicated by its name. A “read invalidate” message requires both a “read response” and a set of “invalidate acknowledge” messages in reply.
- writeback: The “writeback” message contains both the address and the data to be written back to memory (and perhaps “snooped” into other CPUs’ caches along the way). This message permits caches to eject lines in the “modified” state as needed to make room for other data.
下面是一个示例,示例里内存中有地址 0 和地址 8 各有两个数据;一共 4 个 CPU ;每个 CPU 只有一个 cache line,使用 direct mapped cache 进行映射。

第一行表示操作的顺序,第二行表示执行操作的 CPU,第三行表示具体的操作,第四行表示具体 cache line 的状态,最后两列表示地址 0 和地址 8 在内存中的数据是否是最新的,V 表示是(Valid),I 表示否(Invalid)。
那么,实际发生的过程如下:
- 初始情况下,cache line 中没有数据,所以是 Invalid 状态,内存中则是 Valid 状态。
- 此时 CPU0 要从内存中载入地址 0 的数据到 cache line 里,此时对应的 cache line 标记为 Shared 状态。地址 0 中的状态依旧是 Valid 状态。
- CPU3 要加载地址 8 的数据,类似于第二步,CPU3 的 cache line 也被标记为 Shared 状态。
- CPU0 要载入地址 8 中的数据,此时会通过
invalidate让 cache line 中的地址 0 的数据替换成地址 8 的数据。 cache line 中的数据还是和主存中保持一致,所以地址 0 和地址 8 还都是 Valid 状态。 - CPU2 要加载地址 0 的数据,并且要进行
Read-Modify-Write操作,此时 CPU2 会发出read invalidate消息来或者对应数据的独占副本,让 CPU3 中的数据失效(尽管此时内存中的数据以及 CPU3 中的数据还是最新的),CPU3 中的 cache line 变为 Invalid 状态,CPU2 中的 cache line 变为 Exclusive 状态。 - CPU2 对地址 0 中的数据进行修改,那么修改之后地址 0 的数据变为 I 状态,cache line 中的数据变为 Modified 状态,内存中地址 0 的状态为 Valid 。
- CPU1 对地址 0 中的数据进行原子递增操作,使用
read invalidate使 CPU2 中的 cache line 进入invalidate状态,CPU2 就会返回read response。CPU1 中的 cache line 进入 Modified 状态,CPU2 中的 cache 变为 Invalid 状态,内存中地址 0 的状态依然是 Valid 。 - CPU1 要加载地址 8 的数据,此时 CPU1 的 cache line 的数据要被替换,因为 cache line 的状态为 Modified ,因此需要先执行
writeback将数据更新到内存,内存中地址 8 的状态转换为 Valid 状态。
上面这一套流程尽管是 work 的,但是考虑这样一种情况,如果 CPU0 尝试修改 cache line 里的数据,但是这个 cache line 里的数据也被 CPU1 载入时,那么就需要发出 invalidate/read invalidate 消息并等待 CPU1 的 ACK。那么:
Since CPU 0 must wait for the cache line to arrive before it can write to it, CPU 0 must stall for an extended period of time.

这个时候我们就需要 store buffers 和 store forwarding 了。
store buffers & store forwarding
store buffers 就是为了避免 unnecessary stalls 而出现的,这种 stalls 不仅仅是 unnecessary ,而且有时候会持续比较久。

对于上一节所提到的这种情况,我们在 CPU 和 cache 中间添加了一个 store buffer 。CPU 会先将这些写操作先记录到 store buffers 然后继续执行其他操作。等待收到其他 CPU 的 cache line 发过来的 response 之后,再将数据从 store buffers 移动到 cache line 。
但是这样的做法显然会带来一个新的问题,比如对于下列代码:
1 | a = 1; |
有了 store buffers 之后,假如初始状态下 a 和 b 均为 0 ,有 CPU0 和 CPU1 ,而且 a 存在于 CPU1 中的 cache line ( Shared 状态),那么就可能出现下面的情况:
- CPU0 开始执行
a = 1; - CPU0 在
cache line中寻找a,发现不在缓存中; - CPU0 发起
read invalidate为了取得包含 a 的 cache line 的exclusive ownership; - CPU0 将对 a 的 store 放入
store buffers; - CPU1 接收到来自于 CPU0 的
read invalidate,返回包含a的 cache line ,并且将这个 cache line 移除。 - CPU0 执行
b = a + 1; - CPU0 收到来自于 CPU1 的 cache line ,cache line 中的
a的值仍然为 0 ; - CPU0 从 cache 中 load
a,得到值 0 ; - CPU0 将
store buffers的值应用,将 cache 中的值设置为 1 ; - CPU0 将
b的值写入 cache line ; - CPU0 执行
assert(b == 2),然后失败了。
这的根本原因是因为有两份 a 的拷贝,一份在 cache 中,一份在 store buffers 里。那如果上面第 8 步中, CPU0 不从 cache line 中加载数据的话而是从 store buffers 中更新数据的话,那就没有这个问题了。这种技术就叫 store forwarding 。

In other words, a given CPU’s stores are directly forwarded to its subsequent loads, without having to pass through the cache.
再考虑下面的情况:
1 | void foo() { |
类似地,初始情况下 a 和 b 均为 0 ,a 只存在于 CPU1 的 cache 中, b 只存在于 CPU0 的 cache 中,因此均为 Exclusive 状态。
正常情况下,上面代码中的断言显然为真,那么我们考虑这样的执行序列,CPU0 执行 foo() , CPU1 执行 bar() :
- CPU0 执行
a = 1,但是对应的 cache line 不在 CPU0 的 cache 中,因此 CPU0 将a的新值放在store buffers,并且向 CPU1 发出read invalidate(个人认为这里发invalidate消息也可以,但是 Is Parallel Programming Hard, And, If So, What Can You Do About It? 提到 cache line 中可能不只是a的数据,意思是别的数据需要发送read invalidate?)消息; - CPU1 执行
while (b == 0) continue,但是此时b对应的 cache line 也不在 CPU1 的 cache 中,因此向 CPU0 发出read消息; - CPU0 执行
b = 1,CPU0 对b对应的 cache line 是有所有权的,因此直接将b的新值存在了自己的 cache line 中; - CPU0 收到了
read消息,并将包含了b更新之后的值的 cache line 传输给了 CPU1 ,并且将自己的 cache line 标记为Shared; - CPU1 收到了包含
b的 cache line 并将其存入自己的 cache 中; - CPU1 现在可以结束
while (b ==0) continue,并进入下一条语句; - CPU1 执行
assert(a == 1),但是 CPU1 此时拿到的还是a的旧值,所以assert(a ==1)会失败; - CPU1 现在收到了
read invalidate消息,并将包含a的 cache line 传输给 CPU0 ,但是此时已经太晚了; - CPU0 收到包含
a的 cache line ,然后将store bufffers中的值刷新到自己的 cache line 中。
这里程序最后断言失败的原因是因为 CPU 不知道 a 和 b 之间的依赖关系。CPU0 对 a 的 store 走的是带延迟的 store buffers ,而对 b 的 store 使用的是 cache 。
我个人认为上述这种情况也属于宏观上 memory reordering 的一种,尽管程序的执行顺序看上去没有发生改变,但是已经影响实际的结果了。
我们之前也提到过 memory reordering 本身不影响单线程程序的执行结果,但是对于上面的这种并发程序就出现问题了。这种情况硬件设计者们就不能直接为我们提供帮助了,但是提供了 memory barrier 来允许程序设计者们显示的告诉硬件这种关系。
memory barrier & invaldiate queues
1 | void foo() { |
这里的内存屏障 smp_mb() 会让 CPU 先把 store buffers 中的值 flush 掉,然后再执行后续的 cache line 的 store 操作。关于实现方式,这里有两种实现方式:
- 刷新
store buffers直到其为空; - 将后续的 store 操作也放入
store buffers中直到store buffers在内存屏障之前的条目都已经刷新到 cache line 中(具体实现可能就是将内存屏障之前的 store 操作都打个标)。
一般来说后面这种方式效率更高,那么对于后面这种方式,此时的操作序列是:
- CPU0 执行
a = 1,对应的 cache line 不在 CPU0 的 cache 里,因此 CPU0 将a的新值放入store buffers,并且发出read invalidate的 message 给 CPU0; - CPU1 执行
while (b == 0) continue,但是包含b的 cache line 不在 CPU1 的 cache 里,因此发出read的 message; - CPU0 执行
smp_mb(),将store buffers中的所有条目都打个标; - CPU0 执行
b = 1,此时 CPU0 对b对应的 cache line 是有所有权的,但是因为store buffers中有打标的条目,因此并不会将b的新值放在自己的 cahce line 中,而是将其放在store buffers中,当然新增的这个条目并不会被打标。 - CPU0 收到了
read消息,并将包含了b更新之后的值的 cache line 传输给了 CPU1 ,并且将自己的 cache line 标记为Shared; - CPU1 收到了包含
b的 cache line 并将其存入自己的 cache 中; - CPU1 现在可以 load
b的值,但是因为b依然是 0 ,因此还是会执行while,b的新值依然放在 CPU0 的store buffers里; - CPU1 收到了
read invalidate的 message ,然后将包含a的 cache line 传输给 CPU0,并将自己 cache 中对应的 cache line 标记为Invalidate; - CPU0 接收到包含
a的 cache line ,然后将store buffers中a的当前值刷新到 cache line ,并将自己的 cache line 标记为Modified; - 因为 CPU0 中被标记的条目已经全部刷新到 cache 中,因此 CPU0 可以尝试将
store buffers中b的新值刷新到 cache 中。 - 因为 CPU0 中包含
b的 cache line 现在不是 Exclusive 状态而是 Shared 状态,因此需要发送invalidate消息给 CPU1; - CPU1 收到了
invalidate消息,使 CPU1 中包含b的 cache line 失效,然后发送acknowledgement消息给 CPU0; - CPU1 执行
while (b == 0) continue,但是因为包含b的 cache line 不在 CPU1 的 cache 中,因此发送一个readmessage 给 CPU1; - CPU0 接收到了
acknowledgement,将包含b的 cache line 置为 Exclusive 状态,将b的新值刷新到 cache line 中; - CPU0 收到了
read消息,将包含b的 cache line 给 CPU1 ,并将自己包含b的 cache line 置为 Shared ; - CPU1 收到了包含
b的 cache line ,并将其刷新到自己的 cache 中; - CPU1 现在可以拿到
b的新值了,因此退出循环; - CPU1 执行
assert(a == 1),自己包含a的 cache line 是失效的,因此它拿到的a值会是最新的,断言通过。
上面的步骤看似复杂,其实也就是保证了 b = 1 这个 store 操作也放进 store buffers 中并在 a = 1 之后执行。
那么截止到现在,我们通过引入 store buffers、store forwarding 以及 memory barrier ,似乎解决了所有问题,但是别忘了 store buffers 相对来说其实很小的,所以不可能写入操作的 cache misses 都会使用 store buffers ,尤其是出现 memory barrier 时,后续的 store 操作可能很多,不能都放的进 store buffers 里。那么当 store buffers 满了之后,CPU 还是会等待对应的 invalidate acknowledgement 。 invalidate acknowledgement 耗时的一个重要原因是因为它必须要确认对应的 cache line 确确实实被 invalidate 了,这个要求当 cache 比较忙的时候是会有一定的延时的,具体例子:如果大量 cache 的 invalidate 请求同时到达,CPU 就可能处理不过来,这个其实就会 stalling 其它的 CPU 。那么这样来看提高 invalidate acknowledgement 返回速度就是比较重要的一件事。
CPU 在发送 invalidate acknowledgement 消息时其实可以不必保证 cache line 被 invaldiate ,可以先拿一个队列存放这些 invalidate message ,这个队列就是 invalidate acknowlegement 。下图就是一个例子,拥有 invalidate queues 的 CPU 可能就会将 invalidate message 放入队列之后就立即返回 acknowledgement 消息了,而不必同步等待。

Placing an entry into the invalidate queue is essentially a promise by the CPU to process that entry before trans-mitting any MESI protocol messages regarding that cache line. As long as the corresponding data structures are not highly contended, the CPU will rarely be inconvenienced by such a promise.
invalidate queues 本质上就是一种同步转异步的思路而已。但是也一定程度上增加了破坏一致性的可能。
我们再考虑之前的代码。
1 | void foo() { |
对比之前的过程,一个不同是,在 CPU1 收到 CPU0 中对于 a 的 read invalidate 的 message 之后,将其放入 invalidate queues 然后就立即返回了。那么在后面进行断言的时候就会失败。这个时候的解决方法同样是内存屏障。我们在 bar() 的第一行和第二行中也加入 smp_mb() 就可以避免这个问题。CPU1 在看到 smp_mb() 之后就会先处理 invalidate queues 中的条目,发现 a 已经不存在自己的 cache 中,就会传输一个 read message 给 CPU0 ,CPU0 就会将最新的值告知给 CPU1 ,断言就不会失败。代码如下:
1 | void foo() { |
这里插入 smp_mb() 其实就是保证 invalidate queues 中的条目都被处理。
summary
本文是尝试从硬件层面简单地概述 CPU 缓存是如何工作的,在 《简述 memory reordering》 这篇文章之外提供更为底层的视角帮助理解并发程序设计中的一些现象和原因。
references
- Is Parallel Programming Hard, And, If So, What Can You Do About It?
- Cache: a place for concealment and safekeeping
- https://en.wikipedia.org/wiki/Cache_placement_policies
- https://en.wikipedia.org/wiki/CPU_cache
- https://en.wikipedia.org/wiki/Cache_coherence#Snooping
- http://igoro.com/archive/gallery-of-processor-cache-effects/